Saturday, October 27, 2012

The Saga of the Mysterious Blue Pipe

We moved into our Dream Home in November of 2010.  Built in 1945, it was a place with character, personality, and a myriad of bizarre quirks left to us by the previous owners.  I could go on and on about the strange row of large nails hammered into the wall, the weird drop-down ceiling that I suppose they thought was an essential part of any early 1980s remodel attempt, the fake rock wall in the bathroom, or even the hook and eye locks on the *inside* of the closets.  Today, though, we're going to delve into the mystery of the Blue Pipe.


Mysterious blue pipe hung down one corner of an upstairs room, jutting down from the ceiling like a bad idea.  It hung the entire distance from ceiling to floor, and to hide it, someone with an overabundance of moxie painted it blue like the walls.  It had no cap on the end, just it's bare pipe threads waiting for something to come along and be reattached.

Where did it go?  What did it do?

Investigation in the attic yielded no answers.  The attic directly above this corner of the room was smooth floor (also painted blue - but a soothing "prison blueish gray"). 

In 2010, as we were moving in, we thought, "Huh.  We should probably do something about that."  And then we moved on.  Everything about trying to get this house purchased had seemed so needlessly hard that the thought of trying to overcome the mysterious blue pipe conjured (at least in my head) images of steel saws, blow torches, and people wearing welding masks.  I envisioned having to turn off the electricity, water, AND the gas just to try to figure out what to do about this pipe. I was certain we'd have to "call somebody" about it.

So we ignored it for two years.

Fast forward to this very day.  A day that will live in infamy greater than any day that Velma pulled the mask of some farmer as she exclaimed "Jenkies!"  In our slow refurbishing crawl of the house, we've come to this room and back to this corner.  With the Mysterious Blue Pipe.

We stood and looked at it a while.  Banged it with a hammer.  The we said to ourselves, "Well, we may as well pry up the floor in the attic and see where it goes."

I stayed in the room as my husband tromped up the stairs because it was my job to smack the pipe up into the ceiling so he could get a read on where exactly to pry into the floor.

"Okay!"
Smack, smack, smack.
Silence.
Smack, smack, smack.
Pause.
Smack, sm...
"Hey!  That's enough."

Lo and Behold!  There was a panel in the floor that came up with relative ease.  Wonder of wonders.  The pipe went...nowhere.  It fastened into another elbow joint and continued on to who knows where under the floor.

Recall that this pipe wasn't capped at it's terminal end, so it wasn't connected to any live utility (water, gas, blue ethereal goo).

Back downstairs, we both stared at it for a minute and my husband said, "What if we just unscrewed this piece?"  So he went to the basement and collected a pipe wrench, fitted it onto the pipe, and then came my only other contribution to this endeavor (besides the ceiling smacking)...
"Lefty loosey"
Turn, turn, turnturnturn...
And the pipe unfastened and slid down out of the ceiling.

Years of Mystery.  Solved in approximately 30 seconds.

 
And now, time for caulk and a plaster patch.
 
Update Edit:
 
Patching process begun!
 

That patch is from a single hole wall patch kit available at Home Depot.  I think it was about 4 bucks, and it has the plate, the mesh, and a handy sticky backing to apply it to the wall.  Just sand, stick, then let it dry and start spackling over it!  Easy Peasy.


Coat one of the spackle!  Also I managed to get the whole top of the room taped off to paint the moulding!  WooHoo!

Monday, September 10, 2012

Darth Traya, done!


So, Darth Traya is done, and added to the costume repertoire! She's mainly a Convention type costume. I've taken her out for a twirl a couple of times, and I have to admit it's not a very "child friendly" costume. Geeks and Gamers at Cons love it though! She was my gateway costume into the 501st Legion (Star Wars Costuming Group), and I will have her on at All-Con (March, Dallas TX) and Dragon Con (September, Atlanta GA) yearly!

Stay tuned for my next Star Wars costume attempt...(pst, it will be an ISO/RSO: Imperial Service Organization. Similar to our 1940s concept of the USO complete with pin-up hair and make-up!)


Friday, August 17, 2012

And then, there was a hat!

The Scarlet Witch Steampunk ensemble work continues, and I have finally gotten around to constructing the hat.  If you pay a visit to my friend's blog, Ribbons and Riesling, you'll see how a hat is actually built from the ground up.  I am a cheater pants, though.

I cheat at Monopoly, cards, and sewing whenever possible, so to make this hat, I started with a hat - A cheap black costume top hat, and I just started covering it with fabric.  Step one was sewing a cylinder to cover the hat.

I hand stitched the fabric close and tight as I could around the hat, but it wasn't tight enough...so then the serious cheating began.  I plugged in the hot glue gun.

While it was heating up, I pleated a length of the fabric to use to cover the brim.

Then I hot glued it to the inside of the hat.

So, then it looked like a hat with a fashionable skirt attached.

Then I folded over the hat skirt and glued it down to cover the brim.  It made a little pleated-like effect with which I was fairly pleased.

The I stitched up a hat band out of the same fabric, and glued it down (a section at a time) all the way around the hat - pulling it tight and pinning it after each section.  When the glue set up, I took out the pins and started work on the embellishments.

This is a picture of Marvel's Scarlet Witch.  As you can see, the headpiece frames the face and it pointed at the tops over the eyes.  My task was to translate this to a Victorian-esque hat that will echo that shape.  Red top hat...so what has two points at the tops and is hopelessly Victorian?  Big freaking Ribbon bows!
Not quite as pointy as I wanted, but I can work with this.  I wired the ribbon myself, so I could shape it easily.

I had to have some veiling, too.  Because I like flounce and fluff.  That's Hansel, my wig-head in the picture.  Hansel?  Hansel?

Once the bows were shaped a bit better and pinned, I think it gives the effect I need to resemble the shape of Scarlet Witch's headpiece.
And because I can, here's an early illustration of Scarlet Witch.  Her mask completely frames her face, but I didn't want to use that look as it reminded me too much of...

...this.


Wednesday, August 15, 2012

Traya Progress, a pictorial...


Not any text, here. I'm just uploading the photos so I can link them for critique. ;-)


Thursday, August 9, 2012

Avengers! Continue to assemble...all the stuff you're making.

Work continues on the "Steampunk" Scarlet Witch!  I finished the skirt, and it was too big in the waist.  Either my measurements have changed since a month or so ago, or I stitched it together wrong, or what have you.  It's too big, though.  I choose to shed no tears and solve it with a clip to cinch it up.

So, let's take a look at the replay...
I stitched together the lining for the bustier, just to take a look at the fit on my dress dummy.  If the skirt turned out too big, even going by my most recent set of measurements, I wanted to make certain a piece like the bustier was altered to fit as close as possible.

Sure enough, there was way more overlap than there should have been.  Plan A?  Continue and pretend like this is not an issue until we get to the zipper.  This was a decent plan.

The main fabric and interfacing together, here.  Seams pressed and getting ready to add the boning.  Note:  I despise pressing curved seams flat.

The boning was just a pre-fab feather-weight with it's own sleeve.

I had to measure, cut, then remove the boning to leave just the sleeve, then stitch the sleeve down, centering it on the seams of the bodice.  Not difficult, but tedious and slow going, as I didn't want to end up with wavy seams.

Done and trying it on the dress dummy!  It fit!  I ended up taking about an extra 1.5 inches off each side of the back so I could lose the extra fabric.  I just lack the handwork and buttons on this piece!

So far, so good.  It's coming together, and I'm not quite as panicked about the amount of costume work I still have left to do.  It's going pretty quickly!


Tuesday, August 7, 2012

So many projects, so little time

So, here we are, well into August, with the start of school around the corner, and about four weeks left in the first of many costuming deadlines.  Today, I spazzed out for about 30 minutes, then I buckled down and started sewing, painting, and such until just a little while ago, when I wrapped up my day with leatherwork with the help of a friend.

First up today was the skirt from this pattern.  It's Simplicity 2172, but don't let the name fool you.  Their actual idea of "simplicity" involves thirty bajillion small pieces, and some require you "cut 9".   /headdesk
I'm making it out of this lovely, shockingly red fabric.  It will be a Steampunk version of the Scarlet Witch (One of Marvel's Avengers).  This large mishappen pile is actually the body of the skirt.
This pile?  This is the "9" pieces sewn together which I then had to pleat.  Yes, pleat, before I attached them to the bottom of the skirt.
See! Pleating like a boss.  This pattern also involved a yoke, waistband and a zipper (my first foray into zipper sewing).  "Did you insert the zipper correctly?", you may ask.  I would reply with, "Do I look like I care?" At which point you would look at the crazy in my eyes and back away slowly.

We also worked on the Darth Traya headpiece this evening.  That's Hansel, in the picture, modelling it for you.  Hansel?  Hansel.
This piece is almost finished.  I put the red trimming around the openings in the leather, and affixed a cabochon to the center above the point.  I now have to attach a small wimple and the wig to the whole thing to make one piece.

Lastly, I put a couple coats of paint on the mask that will serve as part of my husband's costume, a Steampunk interpretation of The Vision (also Marvel's Avengers).  This will be cool when I'm done with it.  But it's just kind of along for the ride, today.
Me, wigged out after a long day of costuming work.


Tuesday, July 17, 2012

Darth Traya: the Revenge of the Headpiece

So, here we are, back on one of the many projects I have on my to-do list, and this one nearly done!  Nearly done except for the part that is making me cross-eyed from looking at it.  No joke, you look at it once and think, "Oh!  It needs to turn/clip/curve/something this way!"  Then you do that, and it looks nothing like the laws of physics says it should and you start again.

So, let's go to the tape...er, pictures.  This is the digital rendering of what this headpiece is supposed to look like, wig included.


Here's the work in progress.  My very good friend and current Member of the 501st, Darth Charles, happens to be a rockin' leather worker, so he's been helping me with the form and construction of the leather parts.  Yes, it does look like some sort of evil chicken carcass.

What we're trying to do right now is get the spacing correct on the holes that have to be cut in the top of the headpiece.  View right.

View left.  The pronounced notch at the bottom of the third hole will get rounded off once we start with the smoothing, applying the dye, and such.  This has been slow going, with quite a bit of trial and error.  Hopefully it will be done soon and ready for submission!


Saturday, July 7, 2012

Eglantine: Bloomers? Oh, I say, capital idea!

Over at Ribbons and Riesling, you may have read Kirsten talking about our little Steampunk group.  We have made-up characters and a made-up blimp, but we take our fun very seriously!

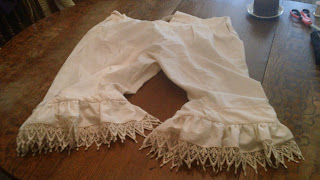
Steampunk costuming can be as difficulty or as easy as you want to make it, and I am combining pieces I have purchased and pieces I have made for the final look of the costume.  The piece I've been working on most recently were the bloomers.  They were based on the bloomers and chemise pattern found at Truly Victorian, but slightly modified for ease of construction (I do swear Victorians put things together in the most inconvenient and difficult ways they could imagine) and for a final wear look that will fit into my costume concept.  I made them shorter and more ruffled because I intend them to be seen.  They come to just above my knee, and will show under a skirt that will be bustled up high, showgirl style.

So, lets go to the pics:

The construction of the body of the bloomers wasn't anything earth shattering.  I made them from an unbleached cotton muslin.


The lace was my favorite part of this project.  I chose a natural, unbleached cotton lace from one of my favorite sewing notions website, NearSea Naturals.


This was the part I hated the most: putting the ruffles together with the inside and outside legbands.  I swore a bit during this step.  It was slow going to get through all the steps necessary, but then...


This was the finished ruffled band, and I was pleased with how nice and girly it looked!  I was so pleased that I almost forgot to start swearing again when it came time to attach both of these to the body of the bloomers.

I did it, though, and without resorting to violence.  I was tired of looking at them, so I did just toss them on the back of the chair and tell myself the handwork could wait until the next morning.


Handwork all done, they turned out pretty well!  Now for trying them on....finding someone else to take a picture....finding the hosiery I chose to go with them for the costume....*le sigh*

You may ask, "Are you lying on the floor?" Yes, yes I am. My photographer chooses to adapt in the manner easiest for the situation. "Mom, the blinds are up and the camera is glaring. Just lay on the floor where the sun won't shine into the camera! I will stand on the coffee table!" Righto, kid.

Now to find the right shoes!  Oh, and make or buy the rest of the pieces (skirt, bodice, hat, gloves).  I already have my Goggles!


Monday, July 2, 2012

Spinning Plates!

In its most literal sense, spinning plates is a circus talent.  My life is often a circus.
I love it when a metaphor fits so well.

Here between I and J, plate spinning most often refers to the act of maintaining a reasonable level of house cleanliness, a slate of sewing and craft projects, a long list of home improvement projects, Happy Family Time, the required level of feline servitude, a social life, and not killing the plants.

The bulk of this past month was spent in Happy Family Time.  We spent 15 days in the beautiful Outer Banks of North Carolina.  Specifically, Ocracoke Island which is part of the Cape Hatteras National Seashore.


This is a lovely shot of the Lighthouse that is still in use on the island.  It's one of a handful of picturesque lighthouses all along the outer banks.


We went on this vacation with a whole troupe of folks:  My Mom and Dad, my brother, my three children , my husband and myself.  In a huge, old house just blocks from the little harbor, we talked, laughed, put together puzzles, cooked fish we had caught, rummaged through the seashells we collected, and just had a fabulous time in general.  It was a good way to spend June.


Oh, and we did collect a metric ton of seashells.  Look forward to blogs concerning what I am going to do with them all.  (omg, what am I going to do with all these shells!?)

I'll try to intersperse those projects with the house refurbishing, the costuming, and everything else.  Just another plate to spin.  I'm getting pretty decent at keeping them all up! I will give a shout out, though, to Darth Charles over at Nerd Ne'erdowells for keeping the feline and plant plates spinning while we were gone.